
Weblayers
Short for Web overlays, sometimes called banners or pop-up.
Weblayers are personalized banners that can be shown on specified pages of your website to a specified audience to drive engagement and conversion. They are executed using HTML, CSS, and JavaScript. They are not pop-ups, and will not be blocked by pop-up blockers.

You can watch this video to get an overview of the basic features of weblayers. Everything is covered in detail in the textual guide too.
Why should you use weblayers
Weblayers have multiple uses and are generally good as call-to-action solutions. Our customers tend to use them to:
- Highlight important information that can change customers' behavior, such as free shipping
- Incentivize subscription to push notifications or newsletters
- Gather information through surveys or update customer attributes
- Create peer pressure by showing how many people are buying/looking at a product.
Creating a weblayer
You can create a reusable weblayer template from the Asset Manager and use it in a campaign later, or as part of a campaign directly. In order to do that, go to Campaigns > Weblayers > + Create new.
You can start creating your weblayer from scratch by selecting the "Blank template" option, or choose one of the existing templates within your project and start from there. These can be either your saved custom templates from under the "Project Templates", or Predefined Templates provided by Bloomreach Engagement. Either way, you will be able to fully customize it using visual and HTML editors.
Old predefined templates
In version 1.178 we have introduced a distinction between Project templates and Predefined templates for better centralized management of the templates created by Bloomreach Engagement, and a brand new set of 9 predefined weblayers. Do not worry about the old templates created by us, however, you will now find all of them under your Project templates.
Setting up a weblayer consists of 4 main parts, usually in this order:
- Design
- AB test setup
- Settings
- Test and evaluation
As with most other campaigns in Bloomreach Engagement, you will be able to locate these tabs in the top left corner.
Design
There are two possibilities for designing your weblayer:
- Editing the parameters in the visual editor
- Changing the code HTML/CSS/JS directly
The properties of each weblayer are defined by its “parameters”. The parameters can contain things like copywriting, position, button visuals, or background color.
The less coding-savvy users can use the visual editor, where the different parameters can be easily edited by simply filling in text inputs or using color pickers. To configure the look and behavior of the weblayer, you can modify these parameters here.
The more technical users can choose to edit them directly within the code editor, using HTML, CSS, and JavaScript. New parameters for the visual editor are also defined within the code using template parameters. This allows you to add more parameters and create your own editable set of templates.
When working with weblayers, you can seamlessly switch between the two editors. This way, you can easily create new custom weblayers by defining the parameters within the code and then editing them in the visual editor (or in the code directly, if that suits you better).
The JavaSript code editor also allows you to add any advanced conditions that cannot be specified using the general settings of the weblayer, such as gaining information about the contents of customers' carts.
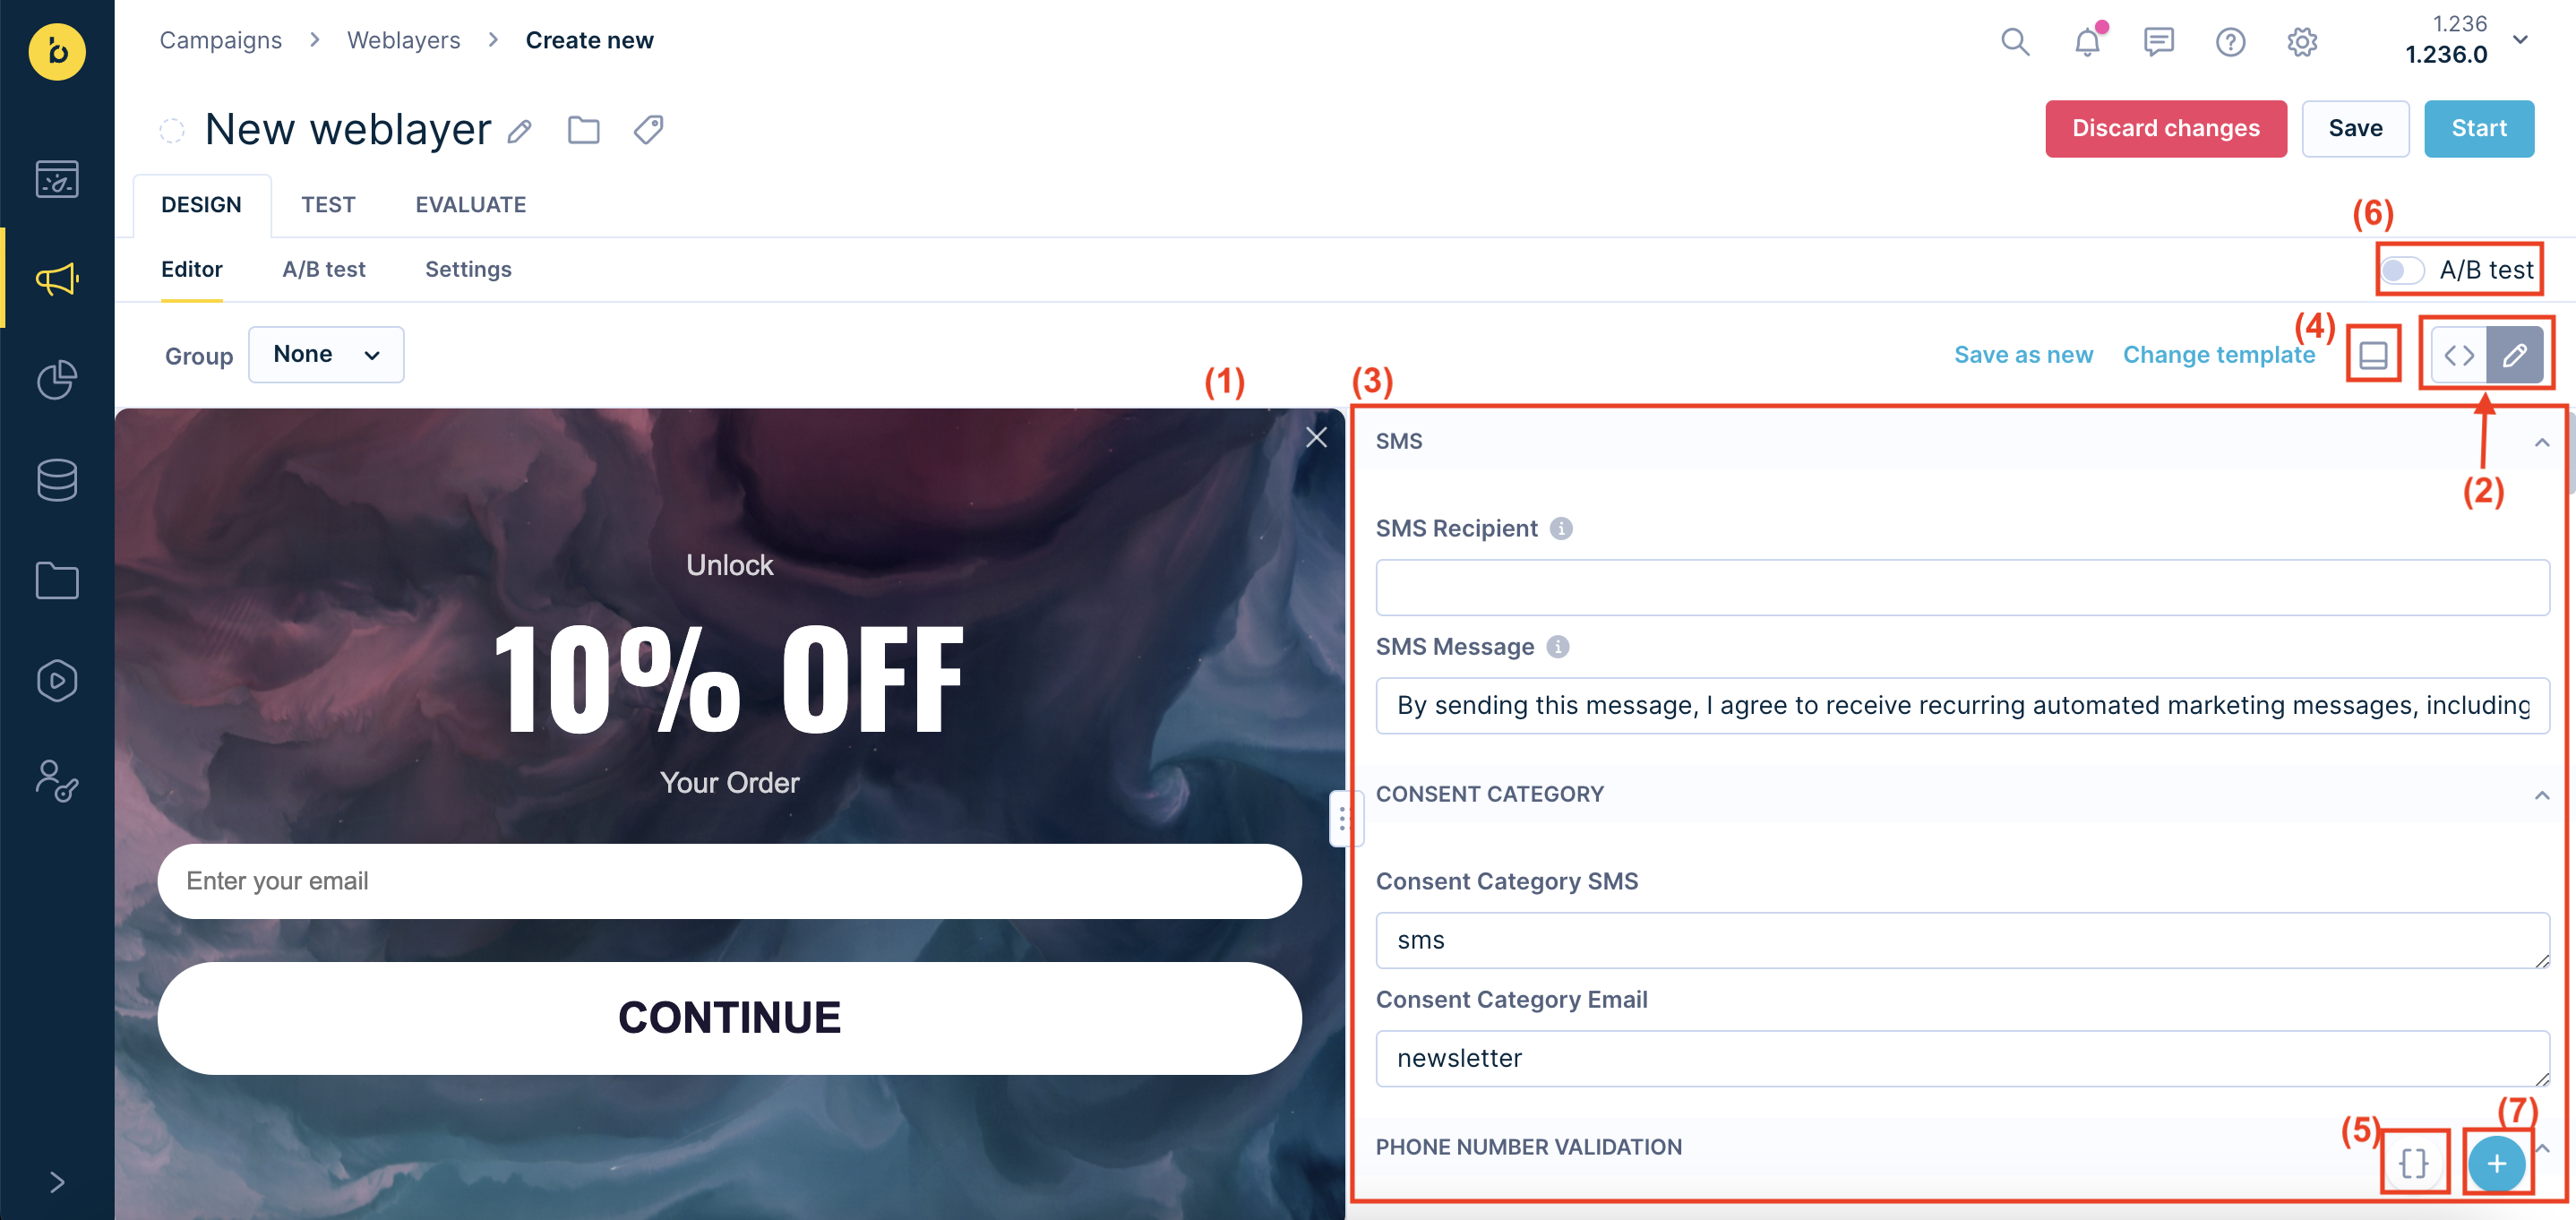
In the following section, we will go over the different parts of the visual editor that you can use to customize your weblayer. The numbers will reference the parts of the screenshot above.
(1) Weblayer preview
A preview of your weblayer is always available next to the parameters editor region and it is updated in real time so that you can instantly preview any changes done in the parameters editor. You can also preview the weblayer and its functionality set up for a particular customer in a particular scenario using the Test tab.
(2) Switch between the code and visual editors
Using these two buttons will toggle between the code editor and the visual editor that you can see on the screenshot. This is to create a seamless workflow between adding new parameters and behavior in the code editor, and then editing and previewing them using the user-friendly visual editor.
(3) The editor region
This region will contain either the code editor interface or the visual editor. You can adjust its size by dragging the 3 dots rectangle at the edge of the region. You can define parameter categories and tooltips for each of your parameters in the code editor. These categories will then translate into collapsable windows, or "groups" of parameters in your visual parameters editor. This helps you with navigating and organizing your weblayer. You can view the tooltip by simply hovering your mouse over the little i icon.
Each parameter can be edited separately and the way you do that in the visual editor will depend on the parameter. For text edits, you will be generally able to type into a text field, you can pick a color using the standard color picker or by inputting its HEX code, for other parameters you might use sliders or choose from a drop-down menu.
(4) Editor docking style
This button allows you to toggle between docking your parameters editor at the bottom (i.e. below the preview) or to the right (as it is on the screenshot). Depending on your personal workflow, the size of the weblayer, or the orientation of your monitor you might prefer one or the other, thus we are giving you the option to customize it yourself!
(5) Jinja personalization
Get information from metrics, and reports, or include personal attributes using Jinja via the personalization button in the bottom right corner. You can select the relevant customer attribute or metric from a drop-down menu and simply copy and paste the created Jinja tag. This button will always be available in the bottom right corner of the screen.
(6) A/B Testing switch
This button allows you to toggle A/B Testing on and off. Upon turning it on, you will be able to work with multiple variants of the weblayer at the same time. Read more about A/B testing later in this article.
(7) Snippets and HTML Blocks
Here, you can use your saved Snippets or HTML blocks or use one of the predefined ones to streamline the creation of new campaigns and save time on repeating tasks. Read more about how to create and use snippets and HTML blocks.
Dimensions and scale are now measured in pixels.
Working with our Predefined Templates
You can choose to kickstart your workflow by selecting one of our new predefined templates when creating a new weblayer. Note that if you want to save your changes, you can only save the template as a copy, as the predefined templates are loaded from a centralized repository and cannot be edited directly. Learn more about our Predefined Templates.

Our predefined templates will have their parameters divided into the following categories, depending on the specific template. The parameters in each category are ordered according to their relevance to each other. If you want, you can configure these categories within the code editor when you're working with a copy of one of the predefined templates.
You can also decide to use a similar structure when creating a new custom weblayer from scratch. The Blank template includes the following categories by default: Copywriting, Triggering, Layout, Typography, and Background.
| Category | Description |
|---|---|
| Background | Set the background color or image. |
| Copywriting | Configure the various text fields and links in your weblayer. |
| CTA | Configure various button parameters. |
| Form | Parameters relating to the font or color of the input fields text. |
| Image | Image source and alt text. |
| Layout | The layout dimensions of your weblayer. |
| Position | Here you will be able to set things like banner edge offset, enter animation, or page alignment. The last one also determines the direction of the slide animation in the following way: horizontal=left -> slide from left horizontal=right -> slide from right horizontal=center, vertical=top -> slide from the top horizontal=center, vertical=bottom-> slide from the bottom horizontal=center, vertical=center -> slide from the top |
| Triggering | In this category, you can configure what "show triggers" the weblayer should use and set the delay in show/hide. On entry - display the weblayer on opening the webpage On scroll - display only after the user scrolls On exit - display when the user navigates away from the page window into the browser address bar and window tabs Show after time: the delay in weblayer display after the trigger condition has been met Remove after time: the time after which the weblayer should remove itself automatically |
| Typography | Centralized text formatting. |
| Visuals | Other visual properties. |
Apart from the standard parameters, there can be additional parameters specific to the individual weblayer type, such as setting the date and time of the countdown end.
Other functionalities
Here is an overview of some other functionalities present but not mentioned previously:
| What | Where | Details |
|---|---|---|
| Group | Drop down menu at the top right in the editor | This is a "policy" setting for banners. If more live banners belong to one group, only one will be shown, prioritized alphabetically. When using showWebLayer(), this policy is ignored. |
| Save as new | Top left of the editor | Saves your weblayer in the Asset manager for later use |
| Change template | Top left of the editor | Change the template you are working with. Note that you can use a different template for every variant. |
Specific predefined templates
Example: if you want to create a “Subscription box”, you have to set up parameters in those templates:
- EMAIL & PHONE; PHONE -> here you have to set parameters in the Phone Number Validation section:
- Initial Country - country code that will be preselected in the dropdown (e.g. us)
- Preferred Countries - countries that will appear at the top of the list (e.g. us, gb)
- Only Countries - If specified, only phone numbers from these countries will be allowed (e.g. us, gb); you should leave it empty if you want to allow all countries
- Invalid Phone Number Message - An error message is shown when an invalid phone number is entered
- Required Fields - you have to fill out the required fields such as Both, Email, Phone number in order to submit the weblayer (available only in the EMAIL & PHONE banner)
- TEXT (mobile only)
- This is a Click-to-Text weblayer, which means that after clicking the subscribe button, it will open a messaging app where you will see predefined text and a phone number of a customer that will see the text in order to sign up for messages from your brand - that is called SMS Short Code.
- You can specify SMS Short Code and Prefilled text message in the weblayer parameters.
We changed the text “By signing up you agree to our Terms and Conditions” in the subscription weblayers to “Insert your consent text/privacy policy/terms and conditions/other mandatory notices as may be required by applicable laws. For information about personal data processing please see Privacy Policy”.
Defining parameters
You can define your custom parameters in the HTML code editor. These parameters will then become visible in the visual editor so that non-technical users can adjust them too. Read more about parameters in Bloomreach Engagement and how they work in our template parameters guide.

With the button in the top right corner of the editor, you can switch between the HTML, CSS, and JS parts of the code, so that you can configure your parameters using code if that is what you prefer to the visual editor.
As you can see in the screenshot above, newly defined parameters have to be in a certain format to allow for collapsable categories and tooltips. The right format of the parameter notation is:
[[ { name: 'paramName', tooltip: 'Tooltip text', category: 'Category name', isJsonParam: true }: type | ‘default value’ ]]"
isJsonParam: true must be present for our parser to recognize the notation otherwise the whole content of {...} will be displayed as the parameter name.
AB test setup
You can enable the AB test settings after toggling on the "A/B test" button in the upper part of the editor. This will create a new line of tabs above the editor. By default, Bloomreach Engagement will create a "Control group" and a "Variant A" which is your current design of the weblayer. You can add more variants by clicking the + button next to the tabs. This will duplicate the previous variant.

You can find all of the settings relating to the A/B testing under the "A/B test" tab next to the "Editor" tab in the top left corner, where you can specify things like the type of distribution. Read more on AB tests in our detailed guide.
Settings
| Conversion goal | The automatic AB test optimization and the automatically generated evaluation report are based on this setting. |
| Schedule | You can choose to display the weblayer instantly or set a specific launch date. |
| Show on | Choose where to show the weblayer: On every page, a page with a specific URL, a page containing an URL, or by creating a regular expression where you define a particular set of URLs. |
| Target devices | Show on any device or only desktop or mobile. |
| Display | Set until when you want to keep showing the weblayer: Until interaction: Shown every time (even after refreshing the page) until the user interacts with the weblayer. This happens when the event banner has interaction = true (defined in the code). This is by default clicking on the banner (closing it, subscribing, etc.) but can be customized.Once: Shown only once for the whole period of running the campaign. This is tracked when the event banner tracks action=show.Once per visit: Shown only once between a session_start and session_end. Once action=show is tracked, it will be shown again only in the next session.Always: Will be shown all the time for each visit, each day, and after each page refresh even when the user closes the weblayer. |
| Category | Choose which consent is required for a customer to have to receive this campaign. Read more on consents here. If you don't use consents yet, you will see the campaign groups setting here. |
| Audience | Define your custom audience that will receive this weblayer. You can use our standard customer and event filters. |
Because weblayers do not have any frequency capping, several weblayers may appear on the same page that can even overlap.
To overcome showing multiple weblayers at once, create an 'Audience' for the weblayer with these conditions.
- For the weblayer with a specific audience, choose the 'Save filter template' option.
- For the second weblayer without a specific audience, choose the 'Fill from template' option, using the template from the first weblayer but negating it (N).
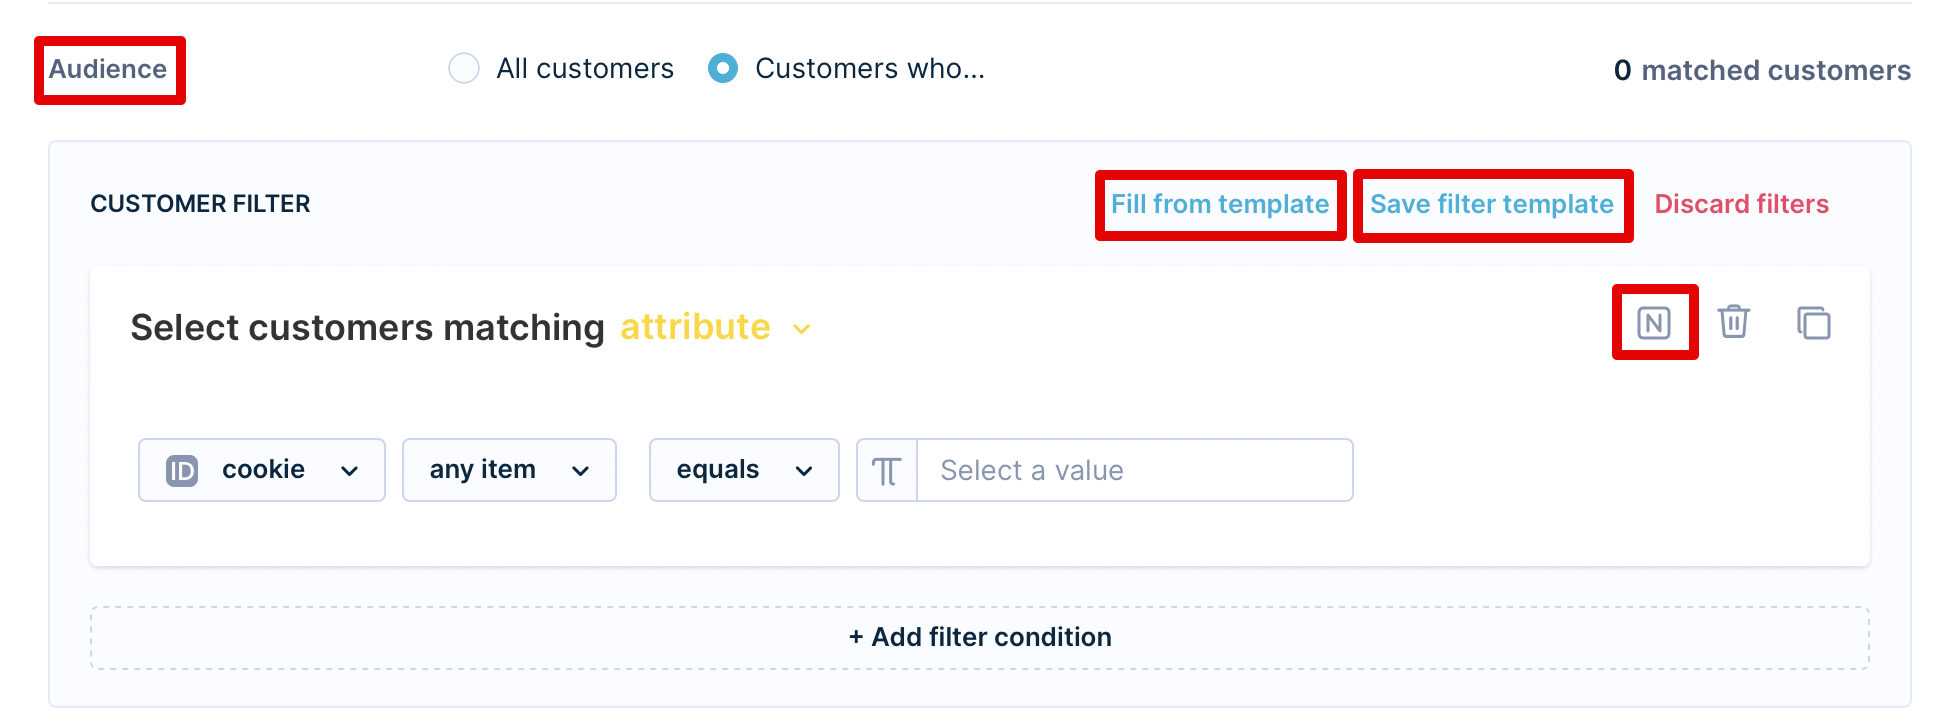
Now, you have set up the conditions so that only only weblayer is displayed at once.
Show on - attributes
You can choose for the weblayer to appear on certain pages by using one of the four Show on" settings explained below. By clicking on add rule you specify multiple settings for a single weblayer. By clicking on add exception you can specify where the layer should not be shown if you chose a too broad show on setting.
1. Any page
The weblayer will appear on all your URL pages.
2. Page with URL
The weblayer will appear on the specific URL page that you choose.

3. Page URL containing
The weblayer will appear on the URL pages that contain the specific string you define.

4. Page matching regexp
If you can use regular expressions you can use them to define where the weblayer should be shown even more effectively. For example, the setting in the image below defines that the weblayer should appear on pages with URLs containing a character from 0 to 9 positioned in front of a "+" sign but behind "/".

5. URL Global Lists
You can use the URL Global Lists feature to create and manage your URL lists in one place.
Display conditions
Bear in mind that the display conditions explained in the table above rely on the tracking of the event
bannerand attributesaction = showandinteraction = true/false. If you change this structure in the JS editor, these conditions won't work properly.
Show weblayer on home page only
There are two ways to display a weblayer only on the homepage irrespective of any UTM parameters in the URL:
A complex one, using regular expressions: choose
Page matching regexdisplay condition and enter the following regular expression into the input field:^(http(|s):\/\/)(my-domain\.com)(\/|)(($)|(\?.*)|(?!.*))$—my-domain\.comshould be changed to the actual domain name of your website (you may escape the dots by adding a backslash, , just like in the example).A simple one, making use of a combination of display conditions. Add one display condition for the homepage visits without any UTM or other parameters by adding a
Page with URLequals to/.
Add two more conditions that handle visits with UTM or other parameters:Page with URL containingequal tomy-domain.com/?and tomy-domain.com?. Check out the screenshot below.

Tip for testing your weblayer
For testing purposes, we recommend setting the condition "Show on page URL containing" to something like "#test". After you have launched the weblayer, you can simply go to www.yourwebsite.com/#test and you will see it in the real environment. You can even send this link to anyone as it will work until you stop the campaign.
Manual triggering of the Weblayer via SDK
Apart from the automatic triggering based on the relevant settings mentioned above, weblayers can also be triggered manually via the SDK function exponea.showWebLayer(). This can be useful if you want to trigger the weblayer by, e.g. a button click, or based on the viewed product attributes.
When using showWebLayer(), the grouping policy and some of the settings from the weblayer setup are ignored (Schedule, ShowOn, Target devices) while some still apply (Audience, Display). The function can be called by a custom JavaScript e.g. using the Tag Manager, or another weblayer. It is, however, not possible to trigger a weblayer by backend events.
Test and Evaluate
The TEST tab provides a preview of the weblayer and a quick summary of the weblayer's settings. Here, you can preview your weblayer in a specific environment - can choose a specific device, the section of the website to preview it on, and a specific customer to preview it for.
Once you start the campaign, you will be able to get insights immediately using the predefined dashboard located in the EVALUATE tab.
Events generated by weblayers
Weblayers generate banner events when being interacted with. These events are defined and tracked in the JavaScript code of each weblayer (enabled by default).
The banner event can have the following attributes.
- action - show, click, close
- banner_id
- banner_name
- banner_type
- variant_id
- variant_name
- interaction
Some weblayers can track additional actions and attributes specific to their UC:
- Subscription banners: upon subscription, they track
action=subscribewith form inputs as attributes (email, first_name, last_name, birthday…) - Web push subscription - upon subscription, they track
action=subscribe
Subscription Weblayers
The email property is tracked as email attribute of the banner event, but not into the email customer property. You need to create a scenario to track the email address as a customer property.
Lag handling
Do not worry about a hypothetical lag in processing events that might lead to a weblayer being shown repeatedly despite being closed by the customer. Our SDK has a session storage logic to prevent weblayers from being displayed after being closed for display settings ‘Until interaction’, ‘Once’, and ‘Once per visit’.
Use cases
Weblayer on a specific day
Sometimes you want to inform your customers about a particular sale/product through a weblayer that pops up on a specific day of the week.
For this, you can either use a JavaScript code or your expression. The expression is very easy to create:


Alternatively, here is an example of JavaScript code. Let´s say you want your customers to see this Weblayer only on Sunday.
var today = new Date(Date.now());
var day = today.getDay()
if (today === 0){
//show banner
    console.log("Sunday")
} else {
//do not show banner
    console.log("Not Sunday")
}
The getDay() method returns the day of the week for the specified date according to local time, where 0 represents Sunday.
In the Bloomreach Engagement app, you can create this model: You display the Weblayer to customers where the expression equals a specific day of the week, which all customers would pass through only on that day. Expression starts on Monday with value 1 and ends on Sunday with value 7. The expression for this model is:
(floor((((((now() / 86400) - 4) / 7)) - floor(((((now() / 86400) - 4) / 7)))) * 7)) + 1
An example is weblayer shown on Friday, so the customer filter needs to be set for this expression to equal 5.

Troubleshooting
Read this article to find answers to the following issues:
- I have launched the weblayer but cannot see it.
- The campaign showed once but it doesn't load again.
Limitations
Special characters used in the weblayer parameters need to be escaped based on their context:
- For parameters used in JavaScript " needs to be escaped as " (e.g. Prefilled Text Message parameter)
- For parameters used in HTML these symbols should be escaped:

Using custom images in weblayers
If you want to use a custom image in the weblayer you can do so by putting the following code into the weblayer's HTML editor: <img src="URL LINK OF YOUR IMAGE" />. This means that you already need to have the picture uploaded somewhere on the web. If you do not you can upload it to our CDN domain via the asset manager. Read more on how in the Asset manager article.
Updated about 2 months ago
Learn how to clone your WebLayers into another project that you have access to in our Cloning article!